“Art is not what you see, but what you make others see.”
Edgar Degas
Introduction
The number one rule in watercolour painting is that there are no rules, although there are some essential guidelines and principles that once mastered, will provide you with the confidence to exploit the full potential of the medium.
As a watercolour artist you will benefit greatly from considering the following:
- Apply your watercolour paint:
- ‘Light to dark’.
- ‘Far to near’.
- ‘Top to bottom’.
- Remember:
- Arrange your equipment carefully to ensure accessibility and the avoidance of unwanted spills onto your painting.
- Have adequate light (consider a daylight bulb if painting indoors at night)
- Be comfortable.
- Have your painting surface at an angle of at least 20 degrees from the horizontal (this encourages paint flow).
- Play some of your favourite music thereby creating the right ambiance for your needs.
- Have your mobile on silent to avoid distraction.
- Avoid touching the surface of your watercolour paper because the grease from your fingers will prevent the paint adhering.
- Have two water containers – one for mixing paint and one for washing your brushes.
- Make sure your brushes and other equipment is clean (including your hands).
- Observe carefully the source of light in your subject, perspective, composition, textures, tones, colours and shape and form.
- Create a centre of interest (taking into consideration the rule of thirds, whereby the paper is divided into three equal sections vertically and horizontally).
- Locate your centre of interest over one of the four intersections.
- Supporting items of interest may be located at the other intersections to create a sense of balance in your work.
- Carefully place the horizon (low for a sense of spaciousness and high for a confined mood).
- Remember that ‘leaving out’ is often better than ‘putting in’ (although it is difficult to restrain oneself)
- Simplify (details, colours and tone).
- Know when to stop, when you reach your goal.
- Cease from fiddling and stop.
- Take an occasional break to refresh yourself.
- Use this time stand back from your work and reflect on progress or potential improvements.
Equally you are advised to remember the 4 P’s:
- Patience (Patience is the companion of wisdom – Saint Augustine 354 AD – 430 AD).
- Perseverance (Energy and persistence conquer all things – Benjamin Franklin).
- Practise (the more I practise the luckier I get – Gary Player, Golfer).
- Planning (failing to plan is planning to fail).
Watercolour Washes
Flat Wash
The flat wash is a principal technique. It is mainly utilised to cover large areas of the paper with a flat brush or mop using a watery mix of paint. Mix sufficient paint before commencing this technique.
It is advised to work from top to bottom, left to right (for right-handed persons) using horizontal strokes. Keep the brush well loaded with the paint and work down the paper until the area is covered. Do try to restrain from going over a previously painted area as this may cause an irregular finish. Rest assured that the area will dry quite smooth and flat although somewhat lighter than when first applied.
Primarily it is applied quickly with the paper tilted at a slight angle (approximately 200) to aid the flow of paint and avoid banding. It may be painted wet onto dry paper or wet in wet although this latter technique presents the artist with less control of the outcome.
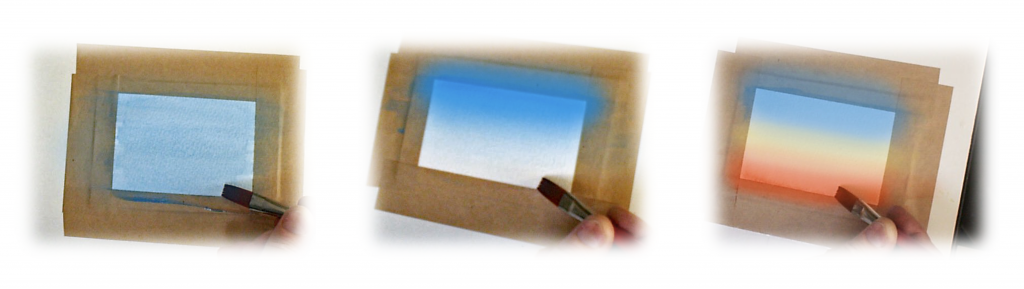
Graduated Wash
A graduated wash is applied in much the same way as a flat wash and mixing sufficient paint.
However in this technique, more water is added to your original mix as you gradually work towards the lower section of the area to be covered.
Alternatively it may be applied (particularly over a smaller area) by allowing the paint on your brush to be gradually used up as you work down the area being painted.
Should the paint run out it is advisable to ‘charge’ the brush with water in order to complete the application.
Once again do try to restrain from going over a previously painted area.
Variegated Wash
A variegated wash is one that has two or more colours merging without any hard edges. Again it is applied using the same approach as a flat wash and a variegated wash. Prior to applying this technique you should mix sufficient quantities of each colour to be used.
Firstly dampen the area to be painted.
Load paint onto your brush (using a brush that is appropriate to size of the area being painted)
Apply the required amount in horizontal strokes.
Clean your brush
Load the second colour and apply in horizontal strokes with the first stroke slightly overlapping the first
Repeat until the area is covered with the required number of variegations
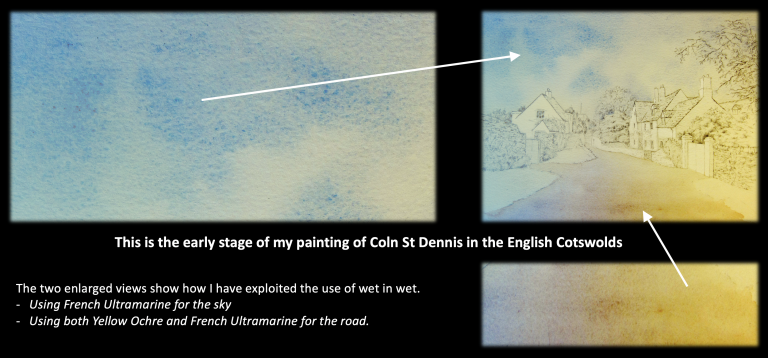
Wet on Wet
Wet into wet provides the artist with the opportunity to achieve beautiful effects. The outcome is somewhat unpredictable and ‘happy accidents’ often occur. However as with many things in life, lots of practise will help the artist influence the outcome. It may be used with just one colour although the subject matter will often require more colours and therefore exploit the full potential of this technique.
Mix the paint you will be using in the normal manner.
To use this technique, wet your clean paper with a clean brush or sponge, making sure to dampen only the area you will be painting with this technique.
Apply through a dabbing/drip technique your prepared colour to the dampened area, (preferably just below the edge) and observe the colour flowing.
Clean your brush and apply your second colour in the required areas. Observe how the colours merge and flow into one another creating beautiful soft internal effects and hard edges where it meets the dry paper.
Repeat and experiment with further colours if required.
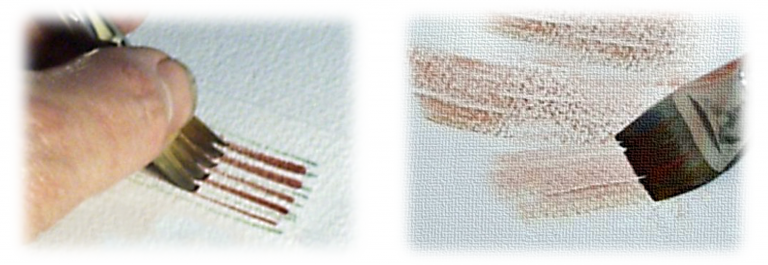
Dry Brush
The dry brush technique provides the artist with the capability of producing textural effects.
- Blades of grass
- The surface of water
- The veins in a flower petal
- Hair
- Fur
- Wood grain
- Or indeed any subject matter that incorporates fine details
As the name implies the brush (all types) is loaded with a fairly dry mix of paint and whilst held almost horizontal, is dragged quickly across the surface of the paper.
It is best applied on NOT (cold pressed) or Rough watercolour paper whereby the ‘tooth’ of the paper will take up the paint and produce the desired broken or granular effect. The illustration (below left) shows the artist holding the brush quite low on the bristles forcing them to separate and therefore creating lines that may be used to simulate a variety of effects. The second illustration (below right) shows how the paper has taken up the paint to create a textural effect.
This technique relates to exploiting the ‘tooth’ of the paper to receive pigment from (as the name implies) a brush that is loaded with almost dry paint. The resultant effect resembles feathery broken marks on the papers surface, which can represent texture and detail.
It is wise to practise on scrap pieces of similar paper before applying to your painting.
- Be bold and confident.
- Avoid going over the same area twice if possible.
Wet on Dry (including Glazing – or overlaying)
The wet on dry technique enables the artist to utilise to the full the beautiful transparency of watercolour in a controlled manner. As the name implies the paint is applied to a dry surface that may be the white of the paper or a previously applied colour. When subsequent layers are applied the result is either a darker tone (when using the same colour more than once) or indeed a completely new colour when it is applied over a different colour.
The process of glazing relates to the application of a thin wash of colour over a dry area. It may be used to create a particular mood or help to establish a centre of interest within a work.
Glazing embraces the full potential of watercolours in that its transparent qualities allow the underneath colour to shine through.
Successive applications of the same colour will enable darker tones to be established, whereas a glaze of one colour over a different one will, as stated previously, create a completely different colour.
In terms of aerial perspective:
- Consider applying a weak blue wash (when the surface is dry) to the distance of a landscape to ‘push it back’.
- Equally a weak warm wash (when the surface is dry) applied to foreground objects to will ‘push it forward’

Preserving the white of the Watercolour Paper
The best white in watercolour painting is the white of the paper. It is therefore important for the artist to consider where whites will be at the planning stage of the painting. To preserve the white paper there are several techniques available to the artist.
These include:
- Carefully painting around or ‘missing out’ the area required.
- Applying a low tack tape over the area.
- Applying Masking Fluid.
Tips
- When using Masking Fluid use an old brush or technical pen, whilst always remembering to wash it immediately after use. (A cocktail stick or similar may be used as an alternative tool).
- Test the Masking Fluid or the low tack tape on a similar piece of scrap watercolour paper before use.
- Use a rubber to remove the masking fluid and not your finger as they may transfer grease to the surface of the Watercolour Paper.
- Remember that there are a variety of Watercolour Paper shades of white, therefore if you want a pure white, e.g. for a white house as in my painting (below left) then select one that meets your requirements from the onset.
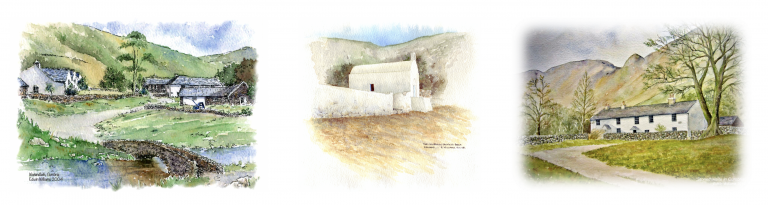
Three of my paintings that exploit the preserving of the ‘white’ of the Watercolour Paper using the above techniques.
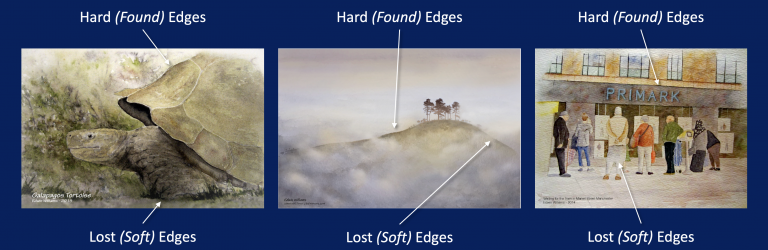
Lost, Soft and Hard (Found) Edges
The edges of the subjects in our paintings are very important to convey shape, size and importance. Equally edges provide a guide to the viewer in terms of them giving a three dimensional sense of depth through exploitation of both linear and aerial perspective principles and techniques.
- Hard Edges define the important centres of interest features of your painting, (think of the ‘rule of thirds and linear perspective’).
- Create well defined Hard Edges by painting on dry paper.
- Don’t overdo Hard Edges as your painting will have too many competing centres of interest.
- Use hard Edges for static subjects.
- Soft and Lost Edges are those that don’t have a defined edge or boundary. They appear to ‘melt’ into the subjects alongside of them. These type of edges will be muted, less detailed, have parts missing and in the distance they will have a leaning towards blue (think of aerial perspective).
- Soft and Lost Edges help to create the illusion of movement.
- Soft and Lost Edges will help suggest shape and contours.
- Soft and Lost Edges help stimulate interest emotions, mood and mystery.
- Through aerial perspective, Soft and Lost Edges help to create a sense of atmosphere.
Be careful not to create subjects that resemble cartoon characters, e.g. by drawing an outline around them before ‘colouring them in’
- This is particularly important when using the line and wash technique, where it is advisable to leave out some of the contour that enables the viewer to fill in the missing parts.
- Equally us a mix of Lost, Soft and Hard Edges to create form and depth in the subject.
Tone
Tone relates to the lightness and/or darkness of an object. It is one of the most important elements for helping artists create the impression of three dimensions on two dimensional pieces of paper.
A good example of tone is observed with black and white photographs, where the image is seen as values of ‘lightness’ and ‘darkness’ and those in between. Tone does not directly relate to colour as red and blue are different hues but they may share the same tonal value.
You will be able to see the tone of a subject more easily by squinting (half closing) your eyes, which is rather like looking through a pair of grey sunglasses. This approach will reduce the amount of colour and light entering your vision and help you distinguish and concentrate on the tonal relationships or values.
It is good practice, before beginning a painting, to create a small (thumbnail) sketch of your subject to establish the tonal values. This sketch will also help establish the source and direction of light, perspective considerations and compositional aspects.
You will certainly find it beneficial to create several paintings through the use of one colour and the example below represents one I created using only Raw Umber.
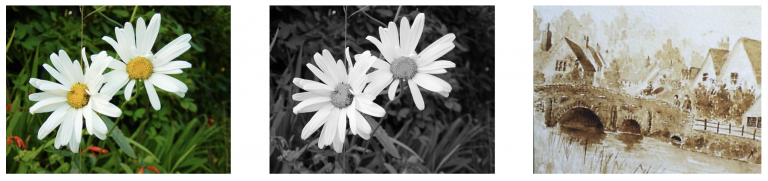
How squinting helps establish tonal values Watercolour painting using one colour
A Useful Tip
Create Swatches that you can use to compare the tones and colours in your subject.
Your Swatches can include:
- Grey scale Tonal Swatches
- Single colour Tonal Swatches – created by progressively adding increasing amounts of water to your pigment.
- A Swatch of the pigments you own.
- A Swatch of the colours you have mixed from different pigments.
- Remember to note the pigments used in all of your Swatches.

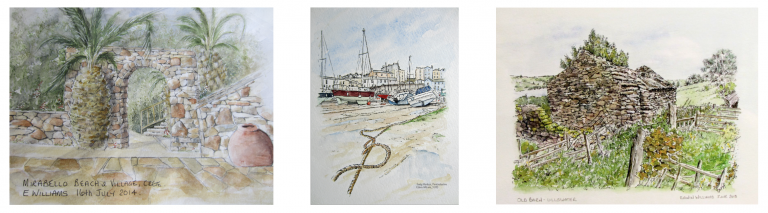
Line and Wash
This technique involves the use of permanent ink, a pen and watercolour.
There is not a prescribed approach to this technique, and the artist may draw the desired subject before applying paint or apply the ink drawing at the end of painting.
Alternatively, the artist may utilise both as the painting develops.
A Useful Tip
To avoid a colouring in book outcome, users of this technique will often be less exact when applying colour.
- This creates a spontaneity that makes the technique quite enjoyable and attractive.
Below are three of my sketches created through the using the Line and Wash technique.